
We usually SHUT the door to this hallway when we have company.
That's how UN-proud I am of this stupid project.
I wanted to make THIS:
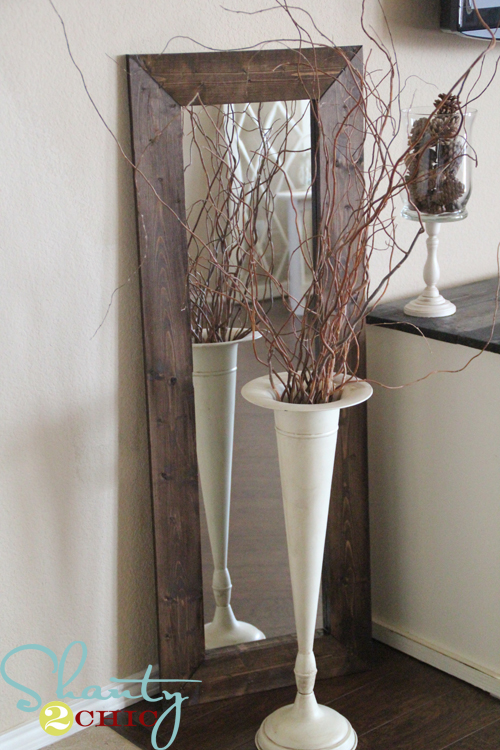
You can find the tutorial for this "simple" and "fast" project here.
Apparently, if you read the comments, the project really is "simple" and "fast". Apparently, if your talent is inclined at ALL toward DIY projects, you can get a cool result.
I APPARENTLY do not have one DIY bone in my body, which I discovered when I tried it last fall.
I decided - why only make one mirror? Why not make three? Because of course ONE is the same as THREE and takes the same amount of effort. I had the perfect location for the mirrors - right in our dining room/living room - our largest living space in the house.
So I went to Home Depot, bought the paint, and bought (most of) the supplies - shaving a couple items off the list that I didn't think were reaaaallly all that necessary.
I was staying at my parents' for the weekend and thought it would be a great idea to use my dad's tools.... because I was actually considering purchasing TOOLS for this project. (I'm shaking my head right now.)
Anyway, $55 later, I set up outside in the beautiful weather. I prepped the mirror glass quickly. This is easy, I thought!
That's where my involvement ended and my dad's began. Unwilling and unable to let me use his chopsaw, he cut all the wood for me. He then proceeded to staple the frames, and only THEN was I able to convince him to scram while I finished up. I was cursing the minute I was born by the time I was able to glue all twelve corners together and get the frames to lay somewhat flat in order to dry, which is when my mom opened the garage door and cringingly told me she needed to back the car out.
Man.... It was even harder to get those suckers to lay flat in the GRASS, especially as the partially-dried glue would no longer adhere to itself and I had to re-glue everything.
(Bonus fact! Can you guess the result of a mirror glued to a frame that's not square! Answer: major warp! Also correct: cracks!)
Anyway, they were almost dry when I started to stain them. This was almost as easy as ripping the original frames off the cheapo mirrors except I was an absolute mess from the stain and only halfway done when William woke up from his nap. My mom interrupted her busy workday to watch him while I hastily finished up.
(Another bonus fact! Can you guess the result of hasty work? Answer: a project that looks like crap!)
The frames and mirrors (not glued together yet) were propped up in my parents' garage. I couldn't fit them in the trunk of the car, so there they stayed when I left that evening.
A couple weeks later, my parents finally made it out to our house and brought the mirrors and frames. As my dad and I carefully carried them into the garage, CRACK! There went one of the mirrors - broken cleanly in half.
Another $6 later, the unfinished project continued to sit in the garage for another few MONTHS. I had become uncertain about the result I had wanted. In trying to maximize the size of the original mirrors, I had fudged the measurements of the tutorial so that only an inch or so of glass was going to be glued to the wood frame. This change, coupled with some comments saying that their mirrors had suddenly dropped away from the finished frames and shattered everywhere, got me thinking that mayyyyybe I should have Brian help me finish.
He was of course super psyched about this awesome item added to his to-do list in the middle of hunting season.... hence his rush to finish.
I was super pregnant by the time everything got hauled into the dining room. Brian lathered everything with Liquid Nails and glued the mirrors to the frames. He then lathered more glue onto the outside (backs) of the mirrors to ensure it all held together.
We flipped the frames over the next day to see that not ONLY were there globs of glue oozing onto the front of the mirrors... but also that the unstained (back) side of the frame was reflected in the mirror. If you can't imagine it... suffice it to say, it looked not good.
Brian instructed me to take a box cutter and trim off the residual glue. This actually worked really well, and I was growing more positive about the result, when I pressed a bit too hard on one of the mirrors and CRACK! See Bonus Fact above.
So now I've got one mirror that's totally shot, and no way in the world that Brian's going to try to replace it, now that it is literally ONE with the frame, thanks to all that Liquid Nails. (Not that I would even ask him to replace it anyway, since I am SO SICK of this project by this point.)
The final step for me is to take a Q-Tip and try to seep some stain into the cracks to retroactively stain the underside of the frame. This was working fairly well until I dripped stain all over my tablecloth. #custommade! #don'tsayit
(These last couple of steps sound sort of concise, but let me assure you that my now-loathing of these mirrors - which I was convinced were going to look just wretched - led to a few days' worth of procrastination between each miserable task.)
Finally.... finally... the mirrors were done and propped against the dining room wall, where they absolutely were NOT going to stay, if my very life depended on it. Every time I walked past them, it was a funhouse-mirror experience due to all the warping (see Bonus Fact above!) And trust me, when you're very heavily pregnant, the very LAST thing you want is a mirror that further contorts your size.
Brian eventually affixed mounting hardware and wire to the backs of each one, and we hung them in the utility hallway. They serve their purpose - William makes funny faces into them while we're getting our shoes on, and they're a great last-minute way to check for gunk in your teeth before you leave for the grocery store. I can't get them very clean - thanks too all the glue and stain practically painted onto their surfaces - but they'll do.
While hanging them, Brian asked, "So what have these mirrors and [other failed attempts at home improvement too pathetic to list here] taught you about trying to do projects like these?"
"Hmmmm," I thought out loud. "I think it means... I need more practice!"
Before he could say wrong answer, I said, "Just kidding. It means God gave me YOU [super capable handyman husband who can do anything around the house] as a sign that I should never ever attempt this stuff again." I paused. "So in the future, either you do it... or it doesn't get done." I paused again. "Or it'll just look like crap."
"Let's leave that last part off," he said as he hung the final frame. "I'll just do it. I don't want my house to look like crap."
 |
| Don't look too bad from a distance.... |
 |
| But don't look now! As mentioned... the corners aren't square! |
 |
| Also... residual stain on the glass! |
 |
| Crrrrack! |
 |
| Hey look! Another nice gouge. Sigh. |

No comments:
Post a Comment